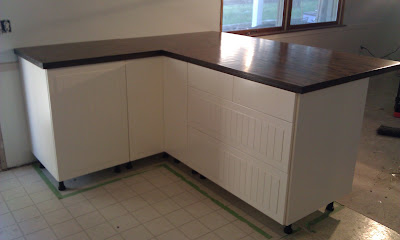
At Lowe's we found Red Oak Hardwood Plywood 3/4" thick. I needed a 1 1/2" thick counter top, so we glued and fastened them together. Once they were dry, we cut the sizes we needed.
Once we had them measured and cut to size we sanded each one with an orbital sander to get rid of the rough edges and get a smooth finish. Make sure that when you are sanding you go with the grain of the wood. Once they were sanded, I then wiped them off with tack cloth to make sure they were free of all dust before applying the wood conditioner.
 |
| The first thing I did was to apply a wood conditioner on both sides. I used Minwax Pre-Stain Wood Conditioner. Make sure you do both sides and the edges. |
 |
| This is with the wood conditioner. Look at how it makes the grain of the wood pop. After the conditioner dried for a couple hours it was time to start staining. |
 |
| I applied 3 coats of stain. I wanted to make sure I got it dark enough, because when you apply the sealer, it has a tendency to lighten the stain. |
Like I said earlier, they turned out so well. I am extremely happy with them.
I welcome any comments or suggestions.


Wow! I was trying to think of a new countertop for my kitchen island and I think your idea is a great solution! I'm bookmarking this project! It looks great.
ReplyDeleteThanks Jennifer! I'm so happy with how they turned out. I will be posting the rest of them tomorrow. Thanks again!
ReplyDeleteThe content of your blog is just what I needed; I like your blog. I was very pleased to find this site. I wanted to thank you for this great read.
ReplyDeletecountertops wy
Whenever you think of starting with kitchen remodeling, the first think you must do is to modernize its look by replacing the existing worktops with the highly durable wooden kitchen worktops that are much in vogue these days.
ReplyDeleteThis advice brought to us by (of course) someone with high-dollar modernization to sell us (Mark Ellis Designs). This isn't a "must" at all to "modernize" an appearance, sport. This is a lakehouse, not a avant garde New york/Los Angeles penthose. What if the owner wants a retro look? A simple restoration?
ReplyDelete