Sunday, July 29, 2012

Budget Friendly Wood Countertops

slkjfoiejlfdkjeoijdlkjf
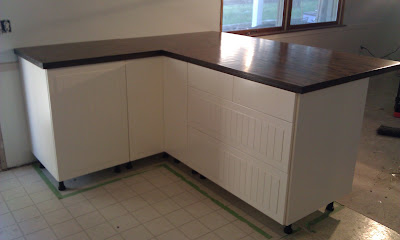
New Counter tops!  I am so happy with how they turned out.  I never expected them to turn out so good. Plus, these are not the counter tops that were in my original plan...Ikea Butcher Block counter tops. When we went to go buy our counter tops, we learned that they did not have any in stock and could not tell us when they would be getting another load in.  They said we would have to just check back.  Well, Ikea is about an hour away so just checking in was not an option.  Or, I could have ordered them online and had them delivered directly to my house, which would be great, but, the shipping charges were more than the counter tops.  
So back to the drawing board I went.  I was determined to have dark wood counter tops.  After much research I discovered how I could do them myself.  Below I have outlined how I did it.  Keep in mind I'm new to the blogging world, so please bare with me. (haha)

At Lowe's we found Red Oak Hardwood Plywood 3/4" thick.  I needed a 1 1/2" thick counter top, so we glued and fastened them together.  Once they were dry, we cut the sizes we needed.

Once we had them measured and cut to size we sanded each one with an orbital sander to get rid of the rough edges and get a smooth finish.  Make sure that when you are sanding you go with the grain of the wood.  Once they were sanded, I then wiped them off with tack cloth to make sure they were free of all dust before applying the wood conditioner.


The first thing I did was to apply a wood conditioner on both sides.  I used Minwax Pre-Stain Wood Conditioner.  Make sure you do both sides and the edges.


This is with the wood conditioner.  Look at how it makes the grain of the wood pop.  After the conditioner dried for a couple hours it was time to start staining.


This is one coat of stain.  I used Minwax Dark Walnut Stain.  I let the stain soak into the wood for about 15 minutes and then wiped off any access stain with a clean soft cloth and let dry about 6-8 hours before applying another coat of stain.


I applied 3 coats of stain.  I wanted to make sure I got it dark enough, because when you apply the sealer, it has a tendency to lighten the stain.
I used a water based sealer called ENDURO-VAR Water Based Urethane.  I applied 3 coats on the underneath side of the counters and 5 coats on top.  I applied each coat with a paint brush and let dry about 3-4 hours.  After each coat I did a very light sanding, using 1200 grit sand paper (go with the grain) to get a smooth finish. Make sure you do the underneath side first so that you don't take a chance of making marks on the top side when you turn them over.

Like I said earlier, they turned out so well.  I am extremely happy with them.

I welcome any comments or suggestions.  
Sunday, July 15, 2012

Wicker Furniture Makeover...Pinterest Challenge Party!


Here is my first makeover for a linky party! 

I found this wicker furniture several years ago at the Maumee Antique Mall (my favorite place to go junking) in Maumee, Ohio for the front porch of our last house. We had a big front porch on a craftsman style home in the historic district.  And it looked great.   


BEFORE:


Now that we have moved to a lake front home, I needed to change it up a little.  So I painted it with Kryon's Outdoor Spray Paint (Taupe).  It took about 5 cans to paint all the pieces.  I then found cushions at Walmart that really gives it the punch that it needed plus I was able to find cushions to match for my swing and our outdoor dining chairs.

AFTER:
Here is the set on the upper level deck overlooking the dock area!


Here is the set, down stairs, on the patio, which is outside the new kitchen we are currently designing. As the complete kitchen renovation is nearing completion, out patio set will see lots of use.

Since I moved our kitchen downstairs we spend more time on the lower level patio, so I moved my wicker furniture to the lower level patio.  Now, I have my table and chairs for eating and my furniture grouping for a more comfortable seating arrangement.

I would love to hear your thoughts! 


For my first linky party I am joining all the girls for the Summer Pinterest Challenge!


Painting is all done and ready for the cabinets...


Jerry picking up our Ikea cabinets. 

Let the fun begin...We found the easiest way to work with Ikea cabinets is too put all the pieces to each cabinet in a pile before you start putting them together.  That worked really well.  All the pieces were there.  The only thing that we needed to return was a damaged cabinet door and they returned it with no problems.

The rail for the wall cabinets is up and we have installed our first wall cabinet.  I'm so excited to see it all start coming together.  With all the demolition that had to be done and some of the unexpected problems that had to be resolved before we could move forward, I didn't think we would ever get to this point.

Wall cabinets are up...there will be a hood range microwave where you see the big gap.  And we still need to install the cabinet fillers.  


Base cabinets are installed...plumbing is ready for my new Ikea Farm sink and Dishwasher.  Oh, I don't think i mentioned my paint colors.  Normally, I am a warm color person, but this time I chose cool colors. Since we live on the lake, I wanted to beachy-cottage look.  After looking at sooooo many paint samples, I chose Better Homes & Garden "Aqua Inlet" on the walls and BHG "The Perfect White" will be used for trim and the wainscoting in the dining room.  Very happy with how it turned out.


At the last minute, I decided to add an island/bar between the dining room and kitchen.  When I started this renovation, I didn't think there would be room for an island/bar, but when we got to that part, I taped out the size on the floor to see if it would work.  And, I loved it.  So it gave me more counter space, more cabinet space and an eat in kitchen.  I've also been working on my counter tops while Jerry and his brother Jay have been installing our cabinets.  My counter tops are going to be awesome...I post them next.

Wednesday, July 11, 2012

Drywall is done...yeah!!!!


Looking into family room...this used to be a regular size door to the 2 car garage.


Cleaning up that drywall dust...ugh!


Looking into the dining room...while Jerry is cleaning up the mess, I am working on my counter tops.

Tuesday, July 10, 2012


Ready for the dry wall...


The cabinets are down and ready for the dry wall professionals. This is looking towards the back door that over looks the lake.


It looks so different with all the cabinets down and opened up.


We have opened up the doorway to bring the Family Room into the Kitchen and Dining Room. The Dry Wall professionals are scheduled to be here tomorrow.

Monday, July 9, 2012

More demolition pictures looking towards the back door.  I can't wait to rip those cabinets out.  


Look...the 6 inch deep concrete slab is gone.  Yeah!!!  Wasn't as bad as I thought it would be.  With the Jack Hammer, it broke it up in about 30 minutes.  The job was disposing of it.  It's a good thing we live out in the country and close to the land fill.  We're on a first name basis there.  


The shower is out, the concrete slab gone, now we just need to remove the rest of the bathroom, tear out the cabinets and open up the door way going into the new family room.  My plan is to make the kitchen/dining room and family room as open as possible.    


Sunday, July 8, 2012

 
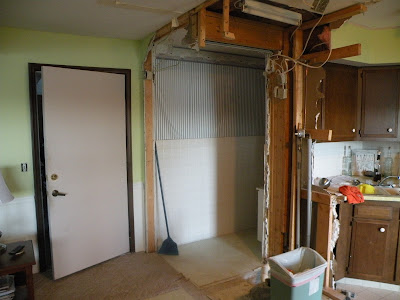
My daughter Amanda is helping with the demolition.  She is removing the closet that separated the family room from the kitchen.


The closet has been removed and now we are working on tearing out the bathroom, which will be moved to a different location.  We are working with such a small area, I need all the space I can get to make room for the layout of my new kitchen.  You are looking at the shower that is actually sitting on a 6 inch slab of concrete. That's something we weren't planning on!  You never know what you're going to find. 


The shower has been removed...now we have to rent a jack hammer to bust up the concrete and get it hauled out.  Can't wait for that mess!  LOL


I actually have more pictures to post of the demolition, but I'm still trying to figure out this blogging thing...it only took me an hour to get these pictures posted.  Hang in there with me.  If anyone has any suggestions on what I should do differently, please let me know.  I can use all the help I can get.


Wednesday, June 20, 2012

Here we go...this is what our kitchen downstairs looked like before the demolition...


Standing in the family room soon to be dining room looking into the kitchen.


Looking into the kitchen from the outside.


Standing in the family room/dining room looking into the kitchen.  This picture pulls in the coat closet that will be removed.


Can you believe how tiny this kitchen is? You get more than 1 person out there and you couldn't move without bumping elbows.  Next, you will see the demolition of the closet and bathroom, which is left of the closet.

 Let the fun begin!!!!


Setting the Stage....

My husband and I bought  Our DIY Lakeside Retreat.  This is what you would call a fixer upper.  It really just needs some updating, but, we have decided to make some major changes.  This is a 2 story home that sits on the lake.  It has a small kitchen and family room downstairs, which is ground level to the lake and is great for entertaining during the summer with the lake.  But, it sucks to carry groceries upstairs to the main kitchen, plus I would much rather be on the ground level with the lake.  So, what we have decided to do is to turn the 1st floor into the main living area and turn the upstairs living room, dining room & kitchen into a master suite, giving us 3 BR upstairs.

This will be our 3rd home we have purchased and turned them all into our home with our touches.  Jerry and I love to do things ourselves.  I like to have the ability to make changes as we progress.  
So, when we started this latest renovation, my daughter suggested that I start up a blog and share it with friends and family.  So...here we go.  I'm sure it will be a little scarey at first, but I promise it will evolve as all of my DIY projects have.


This is the side that faces the lake.


Standing on the porch looking down to the lake.